A seasoned professional HVAC technician can walk you through simple do-it-yourself alternatives for the most typical HVAC repairs. You won’t have to pay the cost of a service call, and you’ll be able to start using the system sooner.
Do-It-Yourself Air Conditioning Maintenance and Repairs
During a period of extreme heat, if your HVAC service stops working, you may just have to wait a few days for some heating and cooling repair specialist or an AC technician to arrive at your home, and the cost of the repair will probably be at least a few hundred dollars.
However, if you are confident working around electrical components and are prepared to spend approximately $50 on parts, you have a reasonable chance at being able to repair your HVAC on your own in approximately two or three hours. This will save you approximately $225 when factoring in the markup on the parts as well as the labor on the minor repairs discussed in this article. .
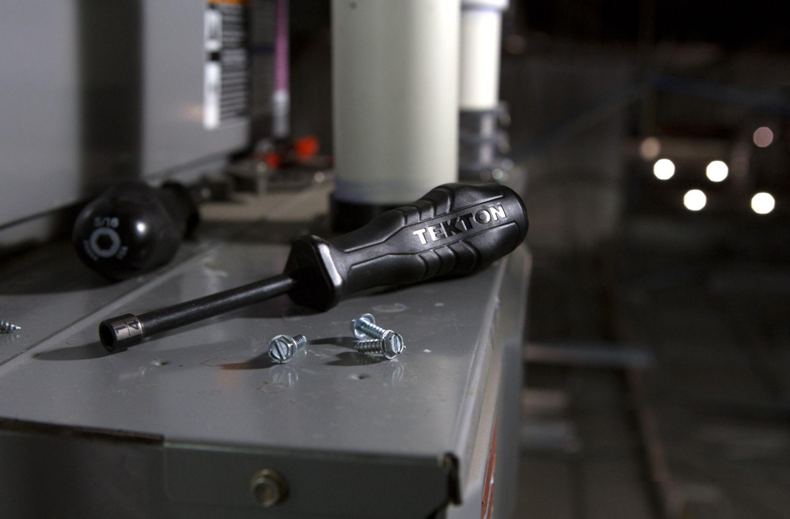
You should be able to solve the most common “low evaporation” and “no cooling” issues with the help of these tips. A low-cost multimeter, an amperage detector, an assorted variety of insulated screwdrivers, and a socket set are all going to be required for this project.
If any of the AC repairs covered in this article don’t work getting your unit back online, at least you’ve covered the more common failures, and the Rhymes Heating & Cooling technician who comes to service your unit can focus on locating the more ambiguous problem. Additionally, with the new components, you will likely add years to the amount of time that the air conditioning does not experience any breakdowns. The first step is as follows.
What Could Be Causing My Air Conditioner to Fail to Cool the House?
Check to See If the Issue Isn’t Caused by the Furnace
Adjust the temperature setting on your thermostat while it is in the air conditioning mode. If the fan on the furnace turns on, there is not a problem with the furnace itself. If the fan in the furnace is not running, the circuit breaker may need to be reset. After doing so, if the fan still won’t start, you should get in touch with a professional because the solutions shown here won’t work.
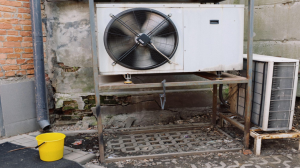
Check the condensing unit that is located outside next. Both the fan and the compressor, which make a noise similar to that of a refrigerator, need to be operating. If this is not the case, follow the procedures for troubleshooting and repairing discussed below. If you don’t feel comfortable doing so, you need to contact your HVAC service provider.
Warning: Make Sure the Power Is Off
Before you pull the exterior disconnect or remove the access panel from the condensing unit, turn off the breakers that control the air conditioner and the furnace inside the primary electrical box. The next step is to make sure that the power is truly turned off by using a voltage testing kit on the wires that are going into the contactor.
The AC relay and start/run capacitor are the components that fail the most frequently and are the least expensive to replace. Therefore, it is in your best interest to go out and purchase and install these other parts as soon as possible, particularly if your HVAC unit is more than five years old. It is also possible for the capacitor fan motor to fail; however, replacing it will cost about $150, so you should postpone purchasing a replacement until you are certain that this is the problem.
If none of these issues and tips seem to apply to you, you probably need to give your HVAC technician a call.
Locate the company logo on the compressor so that you can purchase replacement parts (not your furnace). Notate the manufacturer, product model, and registration number (or take a photo). You can purchase the components at a store that specializes in appliances or furnaces, or you can do so online.
Both the condensing unit, which is located outside your home, and the evaporator coil, which is typically referred to as an A-coil and is located in the plenum of either your heater or air handler, are the two primary components that make up central air conditioning service systems for residential homes.
The heat from inside your home is picked up by the refrigerant (Refrigerant – Wikipedia) that is contained in the A-coil and transferred to the condensing unit that is located outside. In order to get rid of the heat, the condensing unit fan circulates air from the outside through the condensing coil.
The HVAC contactor, the start/run capacitor(s), and the condenser fan motor are all located within the condensing unit. Each of these components can be replaced by a do-it-yourselfer. The compressor is housed within the condensing unit; however, only a trained technician should replace it. There are no components of the coil that are serviceable by a do-it-yourselfer.
Put an end to the power supply
Twist the disconnect block out in a straight line after opening the electrical box that is located next to the condenser coil. Make sure that the power is completely turned off by using a voltage detector to examine the contents of the box. The air conditioning maintenance and repair power must be turned off.
Ensure that the Condenser Coils are Cleaned.
To clean out the gunk that has accumulated under the cover, direct the garden nozzle so that it points upward from the edge of the evaporator coils.
Continue working your way all around its coil in its entirety. After that, point the nozzle downward and flush the particles down its coil fins to complete the process. To remove any debris that may still be present, change the setting on the nozzle to a gentler stream, and then fire water directly into coils.
Air conditioner condenser coils should be cleaned regularly.
Examine the fuses
There are a lot of disconnect blocks that have two cartridge fuses each. Before continuing with the repairs, you should first check them. A blown fuse is an indication that a component within the condensing unit is malfunctioning. Therefore, do not simply replace it and believe that the issue has been resolved. In its place, the parts should be replaced, new fuses should be installed, and the unit should be turned on. If it starts blowing again, you need to call a pro because the problem is getting more serious.