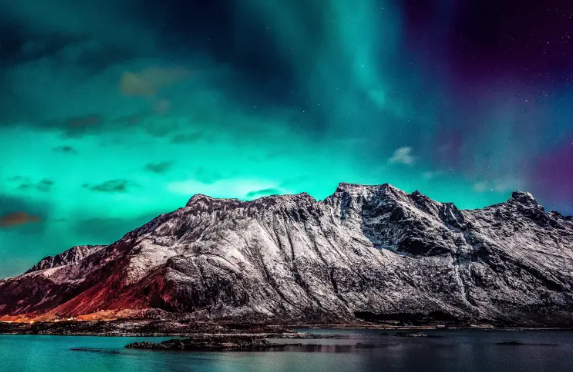
The Northern Lights, or Aurora Borealis, are more than just a natural phenomenon; they’re a celestial performance that few get to witness in their lifetime. These ethereal lights dance across the night sky in a spectacle of colors, leaving anyone lucky enough to see them in awe.
The aim of this article from WonderInn is straightforward: to guide you in capturing the magic of the Northern Lights through your camera lens. Whether you’re a seasoned photographer or a beginner, these tips will help you take great photos when glamping in Norway.
Understanding the Northern Lights
The Science Behind the Spectacle
The Northern Lights are a result of charged particles from the Sun colliding with Earth’s atmosphere. When these particles interact with oxygen and nitrogen, they create a radiant display of colors that light up the night sky. The colors can range from green to pink to violet, depending on the type of gas and the altitude at which the collision occurs.
The Challenge of Capturing Them
Photographing the Northern Lights is no simple task. First, they’re unpredictable. While there are forecasts, the lights can appear and disappear within minutes, giving you a narrow window to capture them. Second, the low light conditions pose a technical challenge. Standard settings on most cameras are not equipped to handle the nuances of capturing this phenomenon, making it easy to end up with blurry or overexposed shots.
Equipment Essentials
Suitable Cameras
When it comes to capturing the Northern Lights, not all cameras are created equal. You’ll need a camera with manual settings for exposure time, aperture, and ISO. DSLRs and mirrorless cameras are generally the go-to options for this kind of photography. They offer the flexibility and control needed to adapt to rapidly changing light conditions.
The Role of a Sturdy Tripod and Remote Shutter Release
A sturdy tripod is non-negotiable. The long exposure times required to capture the Northern Lights make handheld shots a recipe for blur. A tripod ensures that your camera stays still, allowing you to capture sharp, clear images from the comfort of your accommodation.
A remote shutter release is another invaluable tool. Even the act of pressing the camera’s shutter button can introduce shake, especially during long exposures. A remote shutter release allows you to take photos without physically touching the camera, eliminating that risk.
Camera Settings
Optimal Settings: ISO, Aperture, and Shutter Speed
Getting the settings right is crucial for capturing the Northern Lights effectively. Start with a high ISO, around 1600 to 3200, to make the sensor more sensitive to light. However, be cautious, as a higher ISO can introduce noise into your images.
For aperture, you’ll want to go as wide as your lens allows, often f/2.8 or f/4, to let in as much light as possible.
Shutter speed is a bit more flexible and depends on the movement of the lights. A good starting point is 15 to 25 seconds. Too short a shutter speed won’t capture the lights effectively, while too long a speed can result in an overexposed image.
Focusing in the Dark
Focusing can be tricky when you’re shooting in the dark. Autofocus is generally unreliable in low-light conditions. Your best bet is to switch to manual focus. Aim your camera at a distant light or bright star and adjust the focus ring until the point of light is as small and sharp as possible. Once focused, avoid touching the focus ring to maintain that clarity throughout your shoot.
Choosing the Right Location
The Importance of Location
The location from which you attempt to capture the Northern Lights can make or break your photography experience. Even with the perfect settings and equipment, a poor location can result in disappointing shots. You’ll want a spot that offers a clear, unobstructed view of the sky, away from any obstacles like tall trees or buildings.
Minimizing Light Pollution
Light pollution is the enemy of Northern Lights photography. The brighter the surroundings, the less vivid the lights will appear in your photos. To find a location with minimal light pollution, head away from city centers and populated areas. Apps and websites that map light pollution can be invaluable tools for identifying the best spots. Once you’re there, give your eyes time to adjust to the darkness for a better assessment of the sky’s clarity.
Timing is Everything
Best Times and Conditions
The Northern Lights are most commonly visible between late September and late March, when the nights are longest. However, even within this window, certain conditions can increase your chances of a sighting. Clear, dark skies are essential, so aim for nights when the moon is not full and the weather is clear. Some experts also suggest that solar activity can impact the visibility of the lights, so keeping an eye on solar forecasts can be beneficial.
The Virtue of Patience and Vigilance
Capturing the Northern Lights is not a quick endeavor; it requires both patience and vigilance. The lights can appear and disappear within minutes, and their intensity can change rapidly. This means you might find yourself waiting for extended periods. Keep your camera set up and ready to go so you can start shooting at the first sign of activity. Continuously monitor the sky and be prepared to adjust your settings as the display evolves.
Composition Techniques
Framing the Northern Lights
Effective framing can elevate your Northern Lights photography from good to great. While it’s tempting to aim your camera straight up to capture as much of the sky as possible, this often results in flat, less engaging photos. Instead, try angling your camera to include some of the landscape. This creates a sense of scale and makes the lights appear even more dramatic.
Using Foreground Elements
Incorporating foreground elements can add depth and context to your photos. Whether it’s a silhouette of a tree, a body of water reflecting the lights, or even a person standing in awe of the spectacle, these elements can make your composition more compelling. They not only add visual interest but also give the viewer a point of reference for the scale and grandeur of the lights.
Post-Processing Tips
Basic Editing Techniques
Post-processing is an essential step in Northern Lights photography. Even a well-captured image can benefit from some fine-tuning. Adjusting the contrast can make the colors pop, while playing with the exposure can bring out details that may have been lost. Sharpening the image can also add clarity, especially if the photo contains stars or other small light sources.
Software and Tools
Adobe Lightroom and Photoshop are industry standards for photo editing and offer a range of tools to enhance your images. For those looking for a free alternative, GIMP provides many of the same functionalities. These platforms allow you to adjust color balance, remove noise, and even layer multiple images for a composite if you’re looking to get creative.
Common Mistakes to Avoid
Overexposure
One of the most frequent errors is overexposing the image, which washes out the colors of the Northern Lights. To avoid this, start with shorter exposure times and gradually increase them if needed.
Incorrect White Balance
Using an incorrect white balance setting can result in unnatural colors. While it’s tempting to leave it on auto, setting your white balance to “daylight” usually yields more accurate colors for the Northern Lights.
Camera Shake
Even a slight movement of the camera during a long exposure can result in a blurry image. Always use a sturdy tripod and consider a remote shutter release to minimize the risk of camera shake.
Ignoring Composition
In the excitement of capturing the lights, it’s easy to forget about composition. As mentioned earlier, incorporating landscape elements or interesting foreground objects can add depth and context to your photos.
Lack of Preparation
The Northern Lights are unpredictable, and you may have a limited window to capture them. Being unprepared can cost you valuable time. Make sure your camera settings are dialed in, and you’re ready to shoot as soon as the lights appear.
Conclusion
Capturing the Northern Lights involves the right gear, location, timing, and technique. Don’t forget post-processing to fine-tune your shots. Mistakes are common, but avoidable with preparation and awareness. Now it’s your turn—head out, capture the spectacle, and feel free to share your results.